\ 迷ったらまずTechAcademyの無料カウンセリング! /
PySide Model/View【第4弾】QStyledItemDelegateでプログレスバー表示&条件付き色分け
QTableView や QTreeView を使ってデータを表示する方法は「ただの文字だけの表」だと、情報が多いときに 直感的に把握しにくい ことがあります。
そこで今回は QStyledItemDelegate を使い、セルの中に プログレスバーを描画したり、条件によってセルの背景色を変える方法 を紹介します。
これを使えば、タスク進捗やステータスをひと目で理解できる かっこいいダッシュボード風のUI を作れます。
サンプルコードはそのままコピーして動かせるようにしてあります。実務的で「ダッシュボード映え」する例も載せています。
目次
QStyledItemDelegateとは
QStyledItemDelegate は、QtのModel/Viewフレームワークで,QTableView / QListView / QTreeView 上の「セルの見た目」や「編集方法」をカスタマイズするためのクラスです。
- 表示:
paint()をオーバーライドして自由に描画できます(プログレスバーの埋め込み、色分け、アイコン合成など)。 - 編集:
createEditor()/setEditorData()/setModelData()で、セルをクリックしたときに表示される編集ウィジェット(例:QComboBox,QSpinBox)を制御できます。
これにより「ただの文字」が「進捗バー」「色付きラベル」「コンボで編集できるセル」などに変身し、ダッシュボードや管理画面の視認性を大きく向上させます。
あわせて読みたい
PySide Model/View【第1弾】表・一覧表示を本格運用!QTableView + QStandardItemModel
表や一覧表示を「とりあえず動かす」なら QTableWidget が手軽ですが、大量データ・外部ソース(CSV/DB/API)・再利用性 を考えると Model/View 方式が圧倒的に便利です…
あわせて読みたい
PySide Model/View【第3弾】シンプルなリスト表示!QListView + QStringListModel
前回の記事では、階層データを扱う QTreeView + QStandardItemModel を解説しました。今回はもっとシンプルに「リスト表示」を作れる QListView + QStringListModel を…
基本コード
実用サンプルです。コピーして動かしてみてください
解説は全体解説と詳細解説をご覧ください。
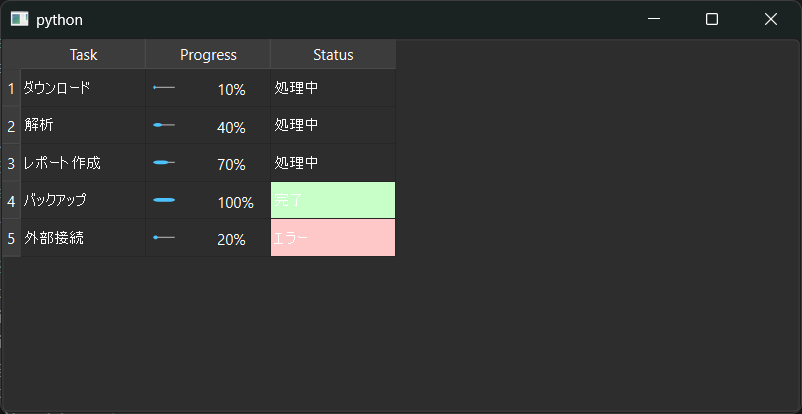
- 1列目:タスク名(文字列)
- 2列目:進捗(数値)→
ProgressDelegateでプログレスバー表示 - 3列目:ステータス(文字列)→
StatusDelegateで背景色をつけ、QComboBoxで編集可能
from PySide6.QtWidgets import (
    QApplication, QTableView, QStyledItemDelegate, QStyleOptionProgressBar, QStyle,
    QComboBox
)
from PySide6.QtGui import QStandardItemModel, QStandardItem, QColor
from PySide6.QtCore import Qt, QSize
import sys

class ProgressDelegate(QStyledItemDelegate):
    def paint(self, painter, option, index):
        # 数値をパーセントとして描画する(整数保存想定)
        try:
            value = int(index.data(Qt.DisplayRole))
        except Exception:
            super().paint(painter, option, index)
            return

        opt = QStyleOptionProgressBar()
        opt.rect = option.rect.adjusted(6, 8, -6, -8)
        opt.minimum = 0
        opt.maximum = 100
        opt.progress = max(0, min(100, value))
        opt.text = f"{opt.progress}%"
        opt.textVisible = True
        QApplication.style().drawControl(QStyle.CE_ProgressBar, opt, painter)

    def sizeHint(self, option, index):
        s = super().sizeHint(option, index)
        return QSize(s.width(), s.height() + 8)


class StatusDelegate(QStyledItemDelegate):
    def paint(self, painter, option, index):
        text = index.data(Qt.DisplayRole)
        # 背景色を条件で変える
        if isinstance(text, str):
            if "エラー" in text or "Error" in text:
                painter.save()
                painter.fillRect(option.rect, QColor(255, 200, 200))
                painter.restore()
            elif "完了" in text or "Done" in text:
                painter.save()
                painter.fillRect(option.rect, QColor(200, 255, 200))
                painter.restore()
        # 標準表示(テキスト描画)
        super().paint(painter, option, index)

    def createEditor(self, parent, option, index):
        cb = QComboBox(parent)
        cb.addItems(["未着手", "処理中", "完了", "エラー"])
        # 値確定と閉じる通知
        cb.activated.connect(lambda _idx, ed=cb: self.commitData.emit(ed))
        cb.activated.connect(lambda _idx, ed=cb: self.closeEditor.emit(ed))
        return cb

    def setEditorData(self, editor, index):
        val = index.data(Qt.DisplayRole)
        i = editor.findText(val)
        if i >= 0:
            editor.setCurrentIndex(i)

    def setModelData(self, editor, model, index):
        model.setData(index, editor.currentText(), Qt.EditRole)

    def updateEditorGeometry(self, editor, option, index):
        editor.setGeometry(option.rect.adjusted(2, 2, -2, -2))


def build_model():
    model = QStandardItemModel(5, 3)
    model.setHorizontalHeaderLabels(["Task", "Progress", "Status"])
    rows = [
        ("ダウンロード", 10, "処理中"),
        ("解析", 40, "処理中"),
        ("レポート作成", 70, "処理中"),
        ("バックアップ", 100, "完了"),
        ("外部接続", 20, "エラー"),
    ]
    for r, (task, prog, status) in enumerate(rows):
        model.setItem(r, 0, QStandardItem(task))
        # Progress を数値として保持(重要)
        model.setData(model.index(r, 1), prog, Qt.DisplayRole)
        model.setItem(r, 2, QStandardItem(status))
    return model

if __name__ == "__main__":
    app = QApplication(sys.argv)
    view = QTableView()
    model = build_model()
    view.setModel(model)
    view.setItemDelegateForColumn(1, ProgressDelegate(view))
    view.setItemDelegateForColumn(2, StatusDelegate(view))
    view.resize(640, 300)
    view.show()
    sys.exit(app.exec())
model.setData(model.index(r, 1), prog, Qt.DisplayRole)のように進捗は数値で保持すると Delegate 側でint()が使えて簡単です。- ステータス列は
StatusDelegateで描画と編集(QComboBox)を同一デリゲートで実装しています。列ごとに別のデリゲートを割り当てられるため柔軟です。
主なプロパティとメソッド一覧(全体解説)
| No | メソッド / プロパティ | 説明 |
|---|---|---|
| 1 | paint(self, painter, option, index) | セルの描画処理を定義します。QPainter を使って自由に描画可能。 |
| 2 | sizeHint(self, option, index) | セル(エディタ)の推奨サイズを返します。行高さや列幅の目安に。 |
| 3 | createEditor(self, parent, option, index) | セル編集用ウィジェット(エディタ)を生成して返します(例:QComboBox)。 |
| 4 | setEditorData(self, editor, index) | モデルの値をエディタにセットします(編集開始時)。 |
| 5 | setModelData(self, editor, model, index) | エディタの値をモデルに保存します(編集終了時)。 |
| 6 | updateEditorGeometry(self, editor, option, index) | エディタの位置とサイズを調整します(通常 editor.setGeometry(option.rect))。 |
| 7 | editorEvent(self, event, model, option, index) | マウスやキーボードのイベントをセル単位で処理できます(チェックボックスの切替等)。 |
| 8 | displayText(self, value, locale) | 値を文字列に整形して表示する際に使います(フォーマット処理に便利)。 |
| 9 | helpEvent(self, event, view, option, index) | ツールチップ等のヘルプ表示を制御できます。 |
| 10 | initStyleOption(self, option, index) | 描画オプション(QStyleOptionViewItem)を初期化する補助メソッド。既定のスタイル情報を取得可能。 |
| 11 | commitData (シグナル) | 編集ウィジェットからデータ確定を通知するために使います(self.commitData.emit(editor))。 |
| 12 | closeEditor (シグナル) | 編集ウィジェットを閉じるよう通知するときに使います(self.closeEditor.emit(editor))。 |
各プロパティ・メソッド 詳細解説
【1】セルの描画
概要:
セルの描画を行うメソッドです。QPainter を受け取り、矩形(option.rect)領域にテキストや図形、アイコン、プログレスバー等を描画します。既存の表示(標準表示)を使いたい場合は super().paint(...) を呼べます。
メソッド:paint(self, painter, option, index)
- 描画前に
self.initStyleOption(option, index)を呼ぶと、フォントや選択状態などの既定情報がoptionに入り便利です。 - 描画は
painter.save()/painter.restore()で囲むと安全です(状態を戻せる)。
使い方:簡単なプログレスバー描画
from PySide6.QtWidgets import QStyledItemDelegate, QStyleOptionProgressBar, QApplication, QStyle
from PySide6.QtCore import Qt

class ProgressDelegate(QStyledItemDelegate):
    def paint(self, painter, option, index):
        # 表示値を取得(数値を想定)
        value = index.data(Qt.DisplayRole)
        try:
            progress = int(value)
        except Exception:
            return super().paint(painter, option, index)

        opt = QStyleOptionProgressBar()
        opt.rect = option.rect.adjusted(4, 8, -4, -8)  # 少し余白
        opt.minimum = 0
        opt.maximum = 100
        opt.progress = progress
        opt.text = f"{progress}%"
        opt.textVisible = True

        QApplication.style().drawControl(QStyle.CE_ProgressBar, opt, painter)
【2】セルやエディタの推奨サイズを返す
概要:
セルやエディタの推奨サイズを返します。行の高さやエディタのサイズ調整に使われます。通常は super().sizeHint(option, index) を使いつつ、必要なら高さを増やして見栄え良くします。
メソッド:sizeHint(self, option, index)
使い方:行を高めにとる
from PySide6.QtCore import QSize

class ProgressDelegate(QStyledItemDelegate):
    def sizeHint(self, option, index):
        sz = super().sizeHint(option, index)
        # 高さを 8 px 増やす例
        return QSize(sz.width(), sz.height() + 8)
【3】ウィジェット(エディタ)を生成
概要:
セルを編集するためのウィジェット(エディタ)を生成して返します。たとえば文字列は QLineEdit、選択肢は QComboBox、数値は QSpinBox などを返します。
メソッド:createEditor(self, parent, option, index)
createEditor()で作ったウィジェットは、setEditorData()→ ユーザー操作 →setModelData()の順で値の受け渡しが行われます。
使い方:QComboBox を返す
from PySide6.QtWidgets import QComboBox

class StatusDelegate(QStyledItemDelegate):
    def createEditor(self, parent, option, index):
        cb = QComboBox(parent)
        cb.addItems(["未着手", "処理中", "完了", "エラー"])
        # 値が確定したらモデルへ反映するための接続
        cb.activated.connect(lambda _idx, ed=cb: self.commitData.emit(ed))
        cb.activated.connect(lambda _idx, ed=cb: self.closeEditor.emit(ed))
        return cb
【4】モデルの現在値をセット
概要:createEditor() で作ったエディタに対して、モデルの現在値をセットします(編集開始時)。エディタの種別に応じて適切に値を入れてください。
メソッド:setEditorData(self, editor, index)
使い方:QComboBox に現在値をセット
class StatusDelegate(QStyledItemDelegate):
    def setEditorData(self, editor, index):
        value = index.data(Qt.DisplayRole)
        i = editor.findText(value)
        if i >= 0:
            editor.setCurrentIndex(i)
【5】編集終了時にエディタの値をモデルへ書き戻す
概要:
編集終了時にエディタの値をモデルへ書き戻す処理を実装します。model.setData(index, value, Qt.EditRole) を使うのが一般的です。
メソッド:setModelData(self, editor, model, index)
使い方:QComboBox の選択をモデルに反映
class StatusDelegate(QStyledItemDelegate):
    def setModelData(self, editor, model, index):
        text = editor.currentText()
        model.setData(index, text, Qt.EditRole)
【6】エディタの表示位置やサイズ
概要:
エディタの表示位置やサイズを設定します。ほとんどの場合 editor.setGeometry(option.rect) で問題ありませんが、余白を取りたいときなどに調整します。
メソッド:updateEditorGeometry(self, editor, option, index)
使い方:
class StatusDelegate(QStyledItemDelegate):
    def updateEditorGeometry(self, editor, option, index):
        editor.setGeometry(option.rect.adjusted(2, 2, -2, -2))
【7】マウスやキーボードイベントを操作
概要:
セル上でのマウスやキーボードイベントをハンドルできます。主にチェックボックスの切替や、セル内部のクリック判定(アイコン押下)などに使います。戻り値は True でイベントを消費したことを示します。
メソッド:editorEvent(self, event, model, option, index)
使い方:チェックボックス風にクリックでトグル
from PySide6.QtCore import QEvent, Qt

class CheckboxDelegate(QStyledItemDelegate):
    def editorEvent(self, event, model, option, index):
        if event.type() == QEvent.MouseButtonRelease:
            # boolean 値をトグルする例
            current = index.data(Qt.DisplayRole)
            new = not bool(current)
            model.setData(index, new, Qt.EditRole)
            return True
        return False
【8】文字列に変換して表示
概要:
モデルの値を文字列に変換して表示する際に呼ばれます(paint() で標準表示を使う場合に便利)。例えば数値に % を付ける、日付を整形するなどの用途です。
メソッド:displayText(self, value, locale)
使い方:
class PercentDelegate(QStyledItemDelegate):
    def displayText(self, value, locale):
        try:
            v = int(value)
            return f"{v}%"
        except Exception:
            return super().displayText(value, locale)
【9】ツールチップやヘルプ表示の動作
概要:
ツールチップやヘルプ表示の動作をカスタマイズできます。QToolTip.showText() を使えば自由に表示できます。
メソッド:helpEvent(self, event, view, option, index)
使い方:ツールチップ表示
from PySide6.QtWidgets import QToolTip

class HelpDelegate(QStyledItemDelegate):
    def helpEvent(self, event, view, option, index):
        text = f"詳細: {index.data(Qt.DisplayRole)}"
        QToolTip.showText(event.globalPos(), text)
        return True
【10】初期化するユーティリティ
概要:QStyleOptionViewItem を初期化するユーティリティ。呼べば option にフォント、ペインティング状態、選択状態などの情報が入ります。paint() の先頭で呼ぶと標準のスタイル情報を利用できます。
メソッド:initStyleOption(self, option, index)
使い方:
class MyDelegate(QStyledItemDelegate):
    def paint(self, painter, option, index):
        self.initStyleOption(option, index)
        # option に既定の情報が入っているので、これを基に描画できる
        super().paint(painter, option, index)
【11】ビュー/モデルへの通知シグナル
概要:
編集ウィジェットから「データをコミットして欲しい」とビュー/モデルに通知するためのシグナルです。エディタでの内部イベント(例:editingFinished、activated)に接続して self.commitData.emit(editor) を呼びます。これによりフレームワークが setModelData() を呼びます。
メソッド:commitData(シグナル)
使い方:
cb = QComboBox(parent)
cb.activated.connect(lambda _idx, ed=cb: self.commitData.emit(ed))
【12】編集ウィジェットを閉じる
概要:
編集ウィジェットを閉じたい(編集モードを終了したい)ときに self.closeEditor.emit(editor) を使って通知します。closeEditor は第2引数にヒントを渡せる(QAbstractItemDelegate.EndEditHint)ことがありますが、通常はエディタだけ渡して OK です。
メソッド:closeEditor(シグナル)
使い方:
cb.activated.connect(lambda _idx, ed=cb: self.closeEditor.emit(ed))よくある質問(FAQ)
paint()はいつ呼ばれる?super().paint()と何が違う?-
表示更新の都度(スクロール、再描画、行の追加など)呼ばれます。
super().paint()を呼ぶと Qt の既定の表示(テキスト、アイコン、選択ハイライト等)を使えます。カスタム描画と既定描画を組み合わせるときに便利です。 - 編集した値がモデルに反映されない(
setModelData()が呼ばれない) -
commitDataシグナルを発行しているか確認してください(例:editor.activated.connect(lambda: self.commitData.emit(editor)))。またsetModelData()内でmodel.setData(index, value, Qt.EditRole)を正しく呼んでいるかもチェックします。 - 同じ列で描画用と編集用の別デリゲートを使いたい
-
QTableViewでは列ごとに 1 つのデリゲートしか設定できないため、描画と編集の両方を同一クラス内で実装する(paint()とcreateEditor()を同じQStyledItemDelegateに実装する)のが普通です。 - セルにボタンやウィジェットを直接置ける?
-
描画時にウィジェットを直接置くのは推奨されません(パフォーマンス問題)。編集時に一時的に表示するエディタウィジェット(
createEditor())はOKです。常時ウィジェットを置きたいならsetIndexWidget()が使えますが、大量アイテムだと重くなります。 - 大量データでも高速に動かしたい(パフォーマンス)
-
paint()内の処理は軽くしてください。重い処理(画像生成・ファイルI/O等)は避け、可能ならキャッシュを使うか、表示する値そのものを単純化します。QStyledItemDelegateは大量アイテムでも高速に動きますが、setIndexWidget()は避けましょう。 editorEvent()とcreateEditor()の違いは?-
editorEvent()は編集ウィジェットを作らずにマウス操作でデータを変えたい場合(チェックボックスの切り替え等)に使います。一方createEditor()は「エディットモード」にしてウィジェットを実際に表示して編集させたいときに使います。
まとめ
QStyledItemDelegate を覚えると、単なるテーブルが「情報を直感的に伝えるダッシュボード」に早変わりします。最初は次のようなステップで学ぶのがおすすめです:
- まずは
paint()をオーバーライドして簡単な色付けや背景ハイライトから試す。 - 次に
sizeHint()で見た目(行高さ)を整える。 createEditor()/setEditorData()/setModelData()を実装して、QComboBoxやQSpinBoxで編集できるセルを作る。- 必要なら
editorEvent()でセルクリックの即時反応(チェックのトグル等)を実装する。
この記事のサンプル(プログレスバー + ステータスのコンボ)を動かしてみて、「どのメソッドがいつ呼ばれるか」を体感してください。慣れると、プロダクトで本当に役立つ“かっこいいダッシュボード”が作れます。次はこの Delegate と QAbstractTableModel を組み合わせて リアルタイム更新(センサー値や API) に繋げると実践的です。